

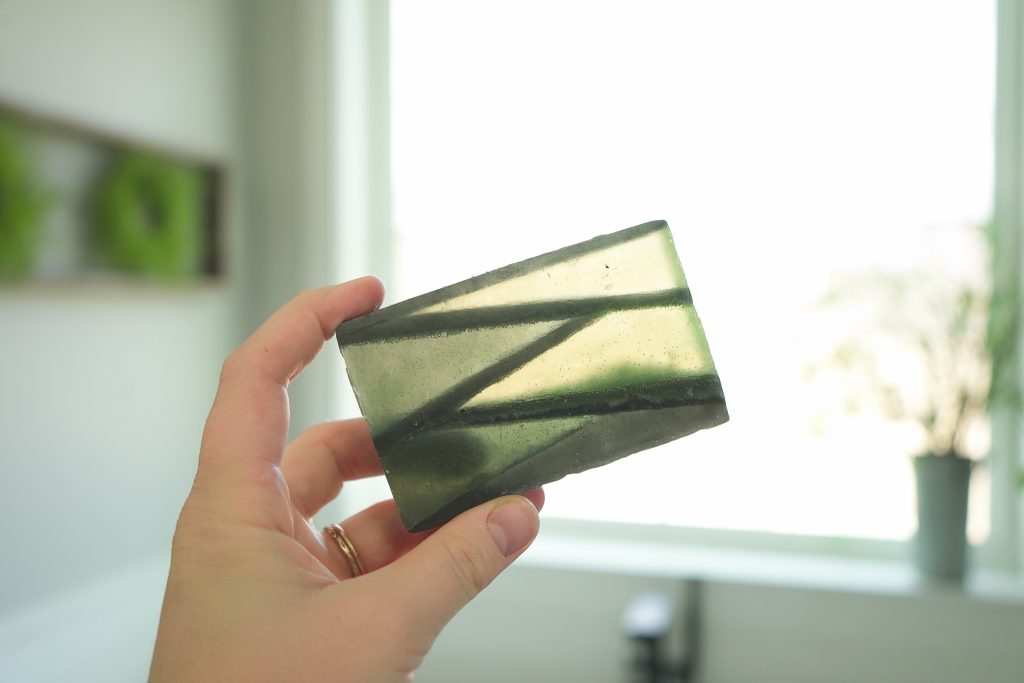
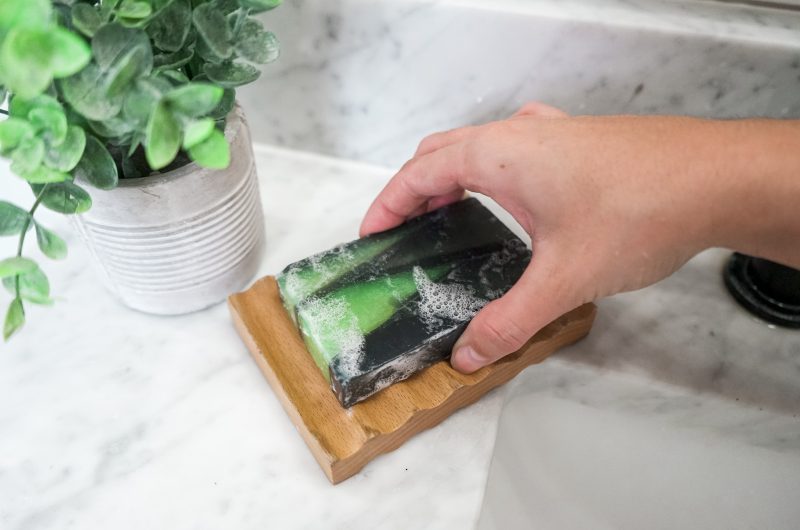
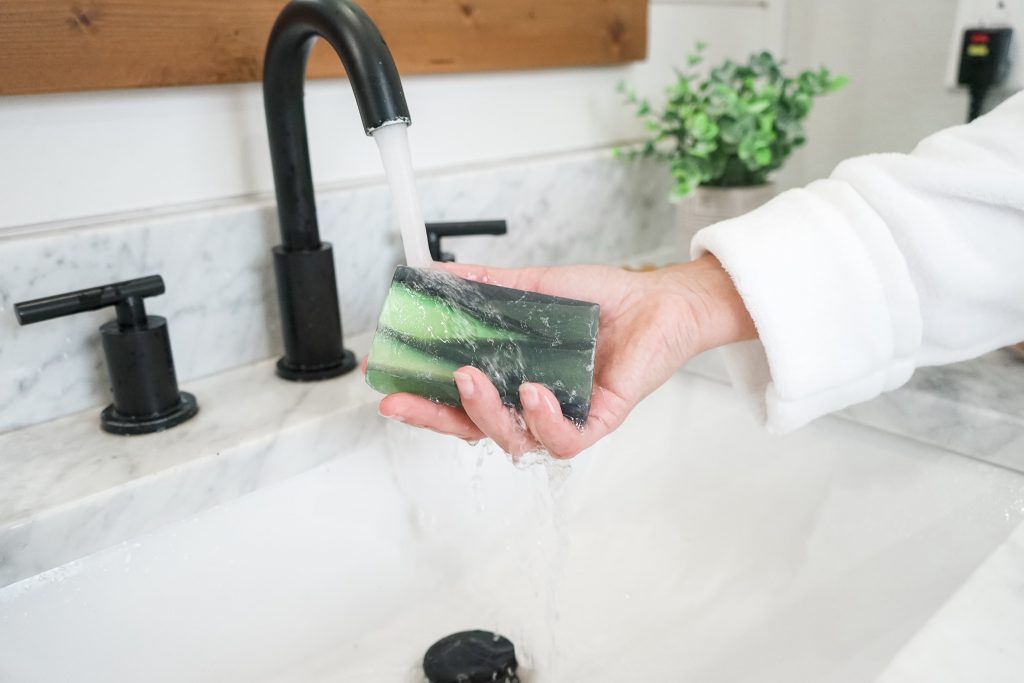
Going for a walk in the pine forest is one of life’s greatest luxuries – the sun sparkling on the needles, the distinct smell of pine in the air.
Now you can take your experience home and make a special craft that captures all its glory. This melt & pour soap recipe inspired by Wisconsin woods using Simply Earth Timber Essential Oil Blend ensures that even when away from nature, a bit of it will still be tucked away with you. Making this Pine Forest Melt & Pour Soap will make you feel like you’ve gone for a forest walk in your home!
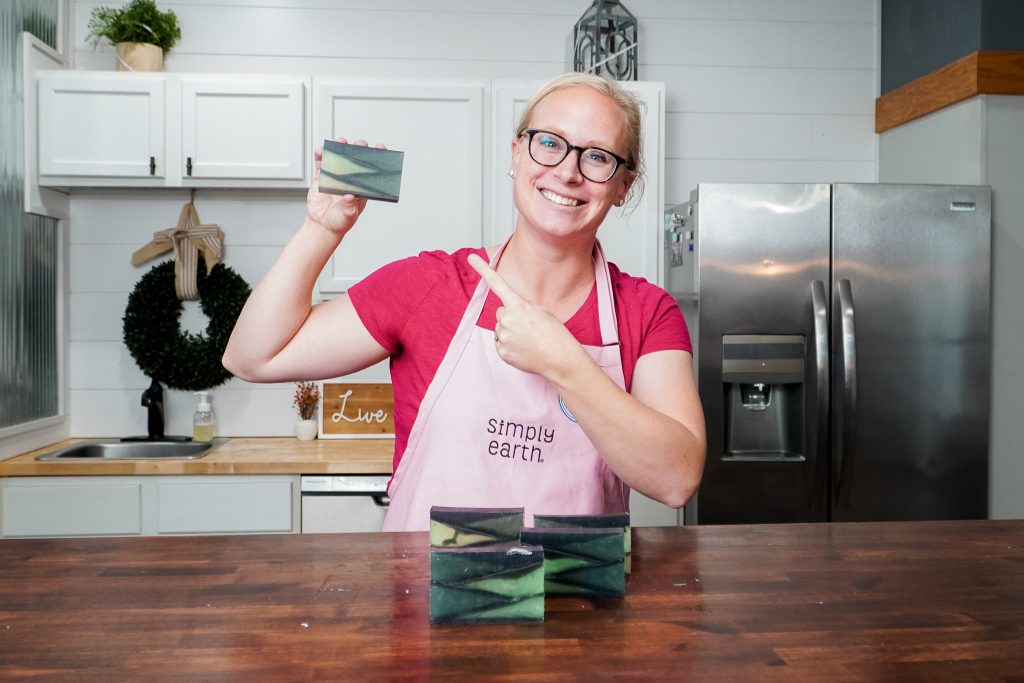
What’s in This Pine Forest Soap Recipe
4” Loaf Mold
With the 4” Loaf Mold, you can show off your creative side with unique designs. Bigger is better, right? With this soap mold, you can make a big, impressive bar of soap.
Glycerin Melt & Pour Soap Base
Simply Earth’s Glycerin Soap Base gives your soaps a vividness that brings out its beautiful swirls and eddies – perfect for stunning designs. Moreover, it’s easy to use for novices and experienced crafters alike!
Mica Powder
With Simply Earth’s Black, Forest Green, and Lime Green Mica Powders, this soap will be all decked out in the colors of the forest! The mica powder will decorate the soap and ensure the color doesn’t fade in the heat. Let your skin join you on a walk through a zen-like evergreen paradise with this soap.
Essential Oils
Not only are Simply Earth’s Timber Blend and Pine Essential Oils perfect for creating a masculine scent, but they also make great skincare ingredients – their natural properties help to nourish, cleanse and protect the skin effectively.
Isopropyl Alcohol (in a spray bottle)
For all aspiring soap makers, one crucial part of creating a perfect Pine Forest Melt & Pour Soap is to make sure you have isopropyl alcohol on hand. Isopropyl alcohol in a spray bottle helps prevent bubbles from forming on the soap and binds the layers together.
Small Book
The book helps you tilt the mold when creating your soap masterpiece! With extra precision in forming diagonal layers, you can ensure no unfinished surface or unappealing detail on your soap.
Things to Remember When Using This Recipe

Always dilute an essential oil when using it on the skin. This essential oil recipe is unlikely to cause skin irritation when diluted properly. If the oil has oxidized (been left with the cap off for long periods of time), it is more likely to cause skin irritation. Check out this dilution chart for diluting this essential oil properly.
This essential oil recipe is not generally safe to use if you are pregnant. Consult your doctor prior to use.

This essential oil recipe is safe to use with kids aged 10+.

Cats may find this recipe irritating. For more information on using essential oils with cats, check out this blog post.

Dogs may find this recipe irritating. For more information on using essential oils with dogs, check out this blog post.
We don’t recommend ingesting essential oils unless under the direction of a doctor certified in aromatherapy. For more information on why we don’t ingest essential oils check out this blog post.
*Please note: This post is a compilation of suggestions made by those that have extensively used essential oils and has not been verified scientifically with clinical tests nor reviewed by medical experts. It is anecdotal information and should be treated as such. For serious medical concerns, please consult your doctor. The statements given in this blog post have not been verified by the FDA
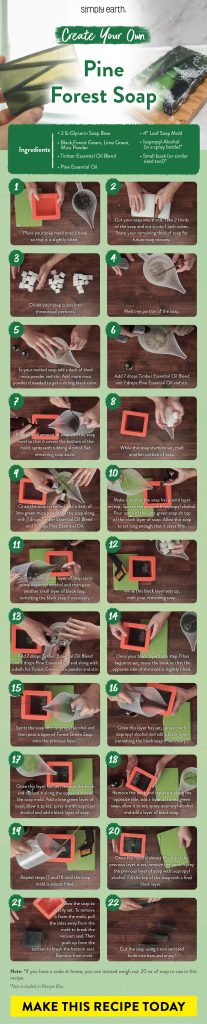
Pine Forest Soap Recipe
Pine Forest Melt & Pour Soap Recipe
Ingredients
- FROM SIMPLY EARTH
2 lb Glycerin Soap Base
Black Mica Powder
Forest Green Mica Powder
Lime Green Mica Powder
Timber Essential Oil Blend
Pine Essential Oil
4” Loaf Soap Mold
- FROM HOME
Isopropyl Alcohol (in a spray bottle)
Small book (or similar-sized tool)
Directions
- Place your soap mold onto a book so that it is slightly tilted.
- Cut your soap into thirds. Take 2 thirds of the soap and cut it into 1-inch cubes. Store your remaining third of soap for future soap recipes.
- Divide your soap cubes into three equal portions.
- Melt one portion of the soap.
- To your melted soap add a dash of black mica powder and stir. Add more mica powder if needed to get a strong black color.
- Add 7 drops of Timber Essential Oil Blend and 7 drops of Pine Essential Oil and stir.
- Pour a small amount of soap into the soap mold so that it covers the bottom of the mold, and spritz with rubbing alcohol. Set remaining soap aside.
- While this soap starts to set, melt another portion of the soap.
- Once the soap is melted, add a dash of lime green mica powder to the soap along with 7 drops of Timber Essential Oil Blend and 7 drops of Pine Essential Oil.
- Touch the layer of black soap in your mold and make sure that the soap has a solid layer on top. Spritz the soap with isopropyl alcohol. Pour some of the lime green soap on top of the black layer of soap. Allow this soap to set long enough that it stays firm when you gently touch it.
- Over this lime green layer of soap spritz some isopropyl alcohol and then pour another small layer of black soap, remelting the black soap if necessary.
- While this black layer sets up, melt your remaining soap.
- Add 7 drops of Timber Essential Oil Blend and 7 drops of Pine Essential Oil along with a dash of Forest Green mica powder and stir.
- Once your black layer from step 11 has begun to set, move the book so that the opposite side of the mold is slightly tilted.
- Spritz the soap with isopropyl alcohol and then pour a layer of Forest Green Soap onto the previous layer.
- Once this layer has been set, spray it with isopropyl alcohol and add a black layer (remelting the black soap if necessary).
- Once this layer has been set, remove the book and replace it along the opposite side of the soap mold. Add a lime green layer of soap, allow it to set, spray it with isopropyl alcohol and add a black layer of soap.
- Remove the book and replace it along the opposite side, add a layer of forest green soap, allow it to set, spray isopropyl alcohol and add a layer of black soap.
- Repeat steps 17 and 18 until the soap mold is almost filled.
- Once the mold is almost filled, and the previous layer is set, remove the book. Spray the previous layer of soap with isopropyl alcohol. Fill the top of the soap with a final black layer.
- Allow the soap to totally set. To remove it from the mold, pull the sides away from the mold to break the vacuum seal. Then push up from the bottom to break the bottom seal. Remove from mold.
- Cut the soap using a non-serrated knife into bars and enjoy!
Notes
- *If you have a scale at home, you can instead weigh out 20 oz of soap to use in this recipe.
Tips for Making Pine Forest Soap
Melting Soap
One of the first steps to this recipe is cutting your soap into 1-inch cubes. This helps the soap melt more evenly. It’s easy to overheat soap, so we want to avoid big chunks of soap that will take longer to melt than smaller ones in the same bowl.
You can melt soap on the stove using a double boiler, straight into a pot, or in a liquid measuring cup in the microwave. Using the stove will make it easier to control the temperature of your soap, but it takes longer. Using a microwave will be faster, but microwaves don’t heat things evenly. To melt the soap in the microwave, you’ll need to use 30-second intervals and stir between each interval.
You want your soap to melt but not bubble up. Soap that is boiling has been overheated. It will still function as a soap but will affect the look of your design. The soap bar will be harder and more brittle.
When first starting with melt and pour soap, I recommend melting it on the stove, so you have more control over how it’s melting.
Soap Layers
For this recipe, we will be creating layers of soap. Between each layer of soap, you must spray it with isopropyl alcohol; otherwise, the layers will fall apart.
We’ll use a book to tilt our mold to create diagonal layers of soap for a pine-tree-like design. You’ll want your book to be on the smaller side so that your layers aren’t too big.
As you’re laying soap, you’ll want to be mindful of the temperatures of your soap layers. Make sure the soap layer you have just poured is set enough to hold the layer above it.
You’ll know the layer is set enough if you can touch it gently with your finger without the layer breaking.
You’ll also need to make sure the layer of soap isn’t too hot; otherwise, it will melt your previous layer, and you won’t end up with clearly defined layers of soap.
The soap you are about to pour should be between 125-135 ° F. If you don’t have a thermometer at home to check the temperature, look for a skin layer of soap on top of your soap. This will indicate the soap is cool enough to be poured.
Mica Powder
For this recipe, we are using three different colors of mica powder. You can swap these colors out for any that you’d like.
When you add the mica powder to the soap, it will at first clump. You can prevent this by first dispersing the mica powder in a small amount of rubbing alcohol. You can also remove clumps by stirring.
Glycerin Soap
Simply Earth glycerin soap will be cloudy and white in the packaging. However, once you melt it, it will become clear. Adding our mica powder will create vibrant soap that is semi-transparent.
Rubbing Alcohol
Rubbing alcohol is an important ingredient for melt-and-pour soap. Spraying it over layers of soap will prevent air bubbles and bind layers of soap together.
Reuse Melt & Pour Soap
If you end up with too much soap for your recipe, you can pour the extra soap into a soap mold. This can be remelted and used in later melt-and-pour soap recipes..
If you have too little soap, simply cut and melt more soap.
Check Out This Pine Forest Soap Recipe Cheat Sheet!
Crafting your own soap recipes at home can be tricky, especially when it comes to getting the ingredients just right. So if you’re ready to stamp yourself an amateur soapmaker, this Pine Forest Soap Recipe Cheat Sheet is here to help you out! It gives clear-cut instructions on creating a magical bar of homemade soap that smells like an enchanted pine forest. Plus, this cheat sheet shares some great tips and tricks that will ensure success in your endeavors– let’s say goodbye to failed soaps once and for all!